
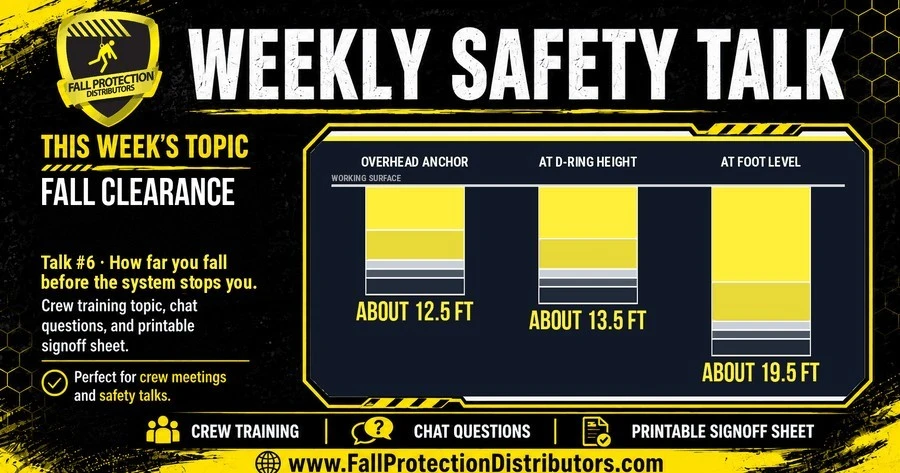
Fall Clearance (Talk #6)
Posted by Howie Scarboro - COO- Fall Protection Distributors, LLC on Aug 28th 2026
By Howie Scarboro, COO, Fall Protection Distributors, LLC · Last verified against the eCFR, osha.gov, and ANSI/ASSP Z359.14-2021 summaries: August 26, 2026
For information purposes only. This page supports your safety planning; it does not replace professional judgment. All safety plans and fall protection decisions for the task must be reviewed and approved by a Competent Person or a Qualified Person before work begins, as required by OSHA.
How Much Fall Clearance Do You Need? The Quick Answer
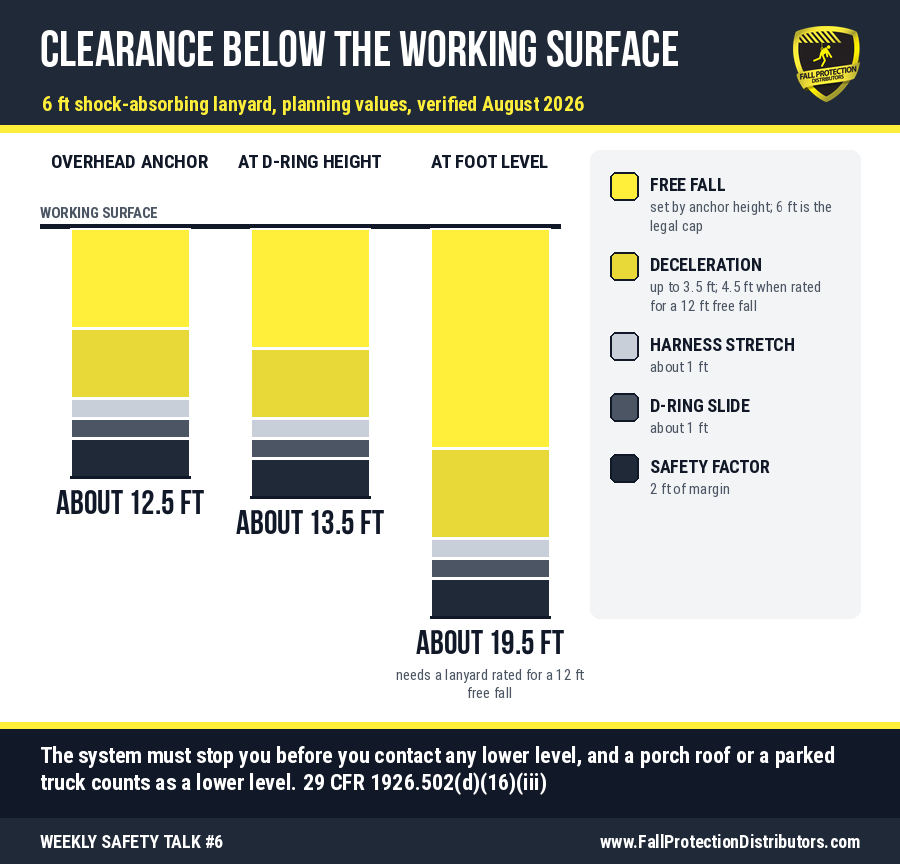
Quick answer: With a standard 6-foot shock-absorbing lanyard, plan on roughly 13.5 feet of clearance with the anchor at the height of your dorsal D-ring, about 12.5 feet with an overhead anchor, and roughly 19.5 feet with the anchor at your feet, which is where most roof anchors are located. All three of those calculations are measured from the surface you are standing on down to the lower level, not necessarily the ground. The fall calculation formula accounts for five components: the free fall before the lanyard comes taut, the shock absorber tearing away additional length, harness stretch, D-ring slide, and a safety factor. A self-retracting lifeline shortens the free fall distance and therefore requires less fall clearance. The legal basis is 29 CFR 1926.502(d)(16)(iii), which requires that the system stop you before you contact a lower level, so a rig without enough clearance below it is a non-compliant rig no matter how good the individual components are. Our free fall clearance calculator runs the numbers for your specific setup.
This is Talk #6 of our Weekly Safety Talk series. Talk #5 covered how the clearance math decides between fall arrest and fall restraint. This talk works through the fall clearance math itself, component by component, because a number like 19.5 feet surprises almost everyone the first time they hear it.
Where the Clearance Requirement Comes From
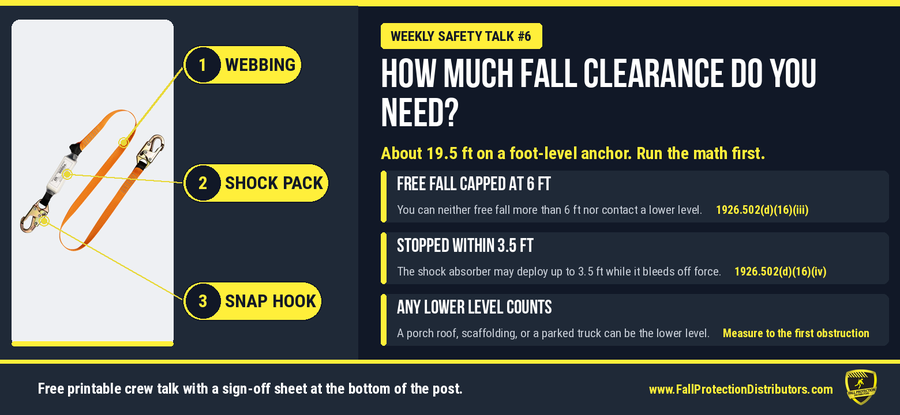
OSHA does not publish a clearance formula in the standard. It publishes a performance requirement instead. Under 29 CFR 1926.502(d)(16)(iii), a personal fall arrest system must "be rigged such that an employee can neither free fall more than 6 feet (1.8 m), nor contact any lower level". The same paragraph requires the system to "bring an employee to a complete stop and limit maximum deceleration distance an employee travels to 3.5 feet (1.07 m)" (29 CFR 1926.502(d)(16)(iv)), and to "limit maximum arresting force on an employee to 1,800 pounds (8 kN) when used with a body harness" (29 CFR 1926.502(d)(16)(ii)). The critical phrase is "nor contact any lower level." A system that arrests your fall but allows your feet to hit the ground did not arrest your fall. The clearance calculation proves the system is adequate to meet the OSHA requirement and protect the worker.
The Five Components of the Calculation
Let's run the numbers for a typical roofer setup for a 6-foot shock-absorbing lanyard, with a snap hook at each end, connected to the dorsal D-ring of a full-body safety harness:
| Component | Planning value | What it is |
|---|---|---|
| Free fall | Set by anchor height; 6 ft is the legal limit | The drop before the lanyard comes taut. It depends on where the anchor sits relative to your D-ring, which is why anchor height dominates the total. |
| Deceleration distance | Up to 3.5 ft | The shock absorber tearing out to bleed off force, capped by 29 CFR 1926.502(d)(16)(iv). Lanyards rated for longer free falls carry larger absorbers that deploy farther. |
| Harness stretch | About 1 ft | Webbing elongation under load. |
| D-ring slide | About 1 ft | The dorsal D-ring shifting up the back as the harness seats during the arrest. |
| Safety factor | 2 ft | Margin so your boots stop above the surface instead of at it. |
When you add those five components for each anchor position, you get the three planning totals below. The difference in fall clearances is due to anchor location and connector type. When the anchor is overhead, the lanyard comes taut almost immediately. When the anchor is at your feet, you fall the height of your own body plus the full length of the lanyard before the absorber even begins to work.
| Anchor position | Approximate required clearance | Where you see it |
|---|---|---|
| Overhead, above the D-ring | About 12.5 ft | Overhead beams, davits, high structural steel |
| At dorsal D-ring height | About 13.5 ft | Wall anchors, mid-height structure |
| At foot level | About 19.5 ft, and only with a lanyard rated for the longer free fall | Roof anchors mounted on the roof surface, the most common residential setup |
Let's run the numbers for a residential roof scenario. A single-story eave sits 10 to 12 feet above the ground. A two-story eave sits 18 to 20 feet up. A worker on a single-story roof with a 6-foot shock-absorbing lanyard using a foot-level anchor needs roughly 19.5 feet of clearance below the anchor location. Even the two-story eave has less margin than it appears once you run the full calculation. Moving that anchor up the roof raises the starting point of the measurement, so an anchor mounted high on the slope adds most of the vertical height between the ridge and the eave to your available clearance. Remember that the gain is the vertical rise, not the distance along the panels: 20 feet up a 6-in-12 slope adds about 9 feet of height. And if a short lanyard on a high anchor cannot reach the eave at all, you have rigged fall restraint without meaning to, which is the better outcome anyway. None of this is an argument against lanyards; it is a reminder to plan accordingly while you can still change the anchor height, the connecting device, or the whole strategy.
Why a Foot-Level Anchor Changes the Required Fall Clearance
If your anchor is at deck level, you fall the distance from your D-ring down to your feet, roughly 5 feet on a full-size adult, plus the 6-foot length of the lanyard before it comes taut. That is about 11 feet of free fall (OSHA's own letters, using 4 to 4.5 feet from the attachment point to the floor, call it about 10 feet), and the OSHA standard caps free fall at 6 feet either way. OSHA addressed this directly in a September 21, 2007 interpretation letter: the agency does not specifically prohibit anchoring at your feet. Still, it recognizes that "anchoring at the employee's feet typically would result in exceeding a 6-foot free fall," and it expects employers to use a more suitable anchorage where one is available.
The equipment industry answered with lanyards designed and tested for 12-foot free falls. These carry a larger energy absorber that deploys farther, which is why our foot-level planning number uses 4.5 feet of deceleration instead of 3.5 and lands at roughly 19.5 feet. Two practical rules follow from this. First, a standard 6-foot shock-absorbing lanyard on a foot-level anchor is out of compliance and out of its rating at the same time, because the absorber was never tested for an 11-foot fall. If the job requires a foot-level tie-off with a lanyard, the lanyard must be built and labeled for the 12-foot free-fall condition. Second, if the clearance for any of this is not there, the answer is not a different lanyard; it is a different system, such as fall restraint rigged so you cannot reach the edge, which Talk #5 covered in detail.
Making Fall Arrest Work on a Single-Story Roof
The 19.5-foot number makes fall arrest look impossible on a single-story house, so let's be precise about what creates that number: an anchor at the worker's own feet and a 6-foot shock-absorbing lanyard, with the worker at the eave. "Foot level" describes where the anchor sits relative to the worker, not relative to the roof. An anchor mounted high on the slope is a foot-level anchor for the worker standing beside it, but for the worker down at the eave, that same anchor sits near or above his D-ring height, and the calculation changes class. Work below an upslope anchor with the slack kept out of the line, using a rope grab on a vertical lifeline or a self-retracting lifeline, and the free fall shrinks from 11 feet toward the 2-to-6-foot range, which pulls the required clearance down from 19.5 feet toward the 13.5 and 12.5-foot planning numbers, measured from the eave where the fall would start. A single-story eave gives you 10 to 12 feet below it, so the margin is real but thin, and the rig must be calculated rather than assumed. That is how a single-story roof becomes workable: mount the anchor upslope, keep the line snug, and let the anchor height do the work. Anchor placement also follows the anchor's manual: the SSRA1, for example, must be installed at least 6 feet from the end of any panel and at least 6 feet from any fall hazard in all directions, so high on the slope means high in the field of the roof, not on the ridge itself. On steep roofs, from 6:12 through 12:12 pitches, the RidgePro is a good option; it anchors over the peak and gives you a strong tie-off point high on the roof. Whichever anchor you choose, good practice in fall arrest is the same as in restraint: set up the work so you never put yourself in a position to get over the edge in the first place. And when the line is short enough that you cannot reach the eave at all, you are in fall restraint, the clearance question disappears entirely, and you have the safest rig on the list.
Why Published Clearance Distances Don't Match, and How to Read Them
If you research this topic, you will find totals of 12.5, 17.5, 18.5, and 19.5 feet quoted by credible sources, sometimes for what sounds like the same setup. Those numbers do not contradict each other; they measure from different starting points and assume different anchor heights. Apply the assumptions published in OSHA's Technical Manual to a 6-foot lanyard anchored at D-ring height, measuring downward from the anchor. The components are 6 feet of free fall, 3.5 feet of deceleration, 1 foot of D-ring shift, 5 feet from the D-ring down to the feet, and a 2-foot safety factor, totaling 17.5 feet below the anchor. Measure that same fall from the surface the worker is standing on, which sits 5 feet below a D-ring-height anchor, and you get 12.5 feet. Our calculator adds a foot of harness stretch on top of that, which is where our 13.5-foot planning number comes from. Manufacturer charts that show 18 or 18.5 feet usually report the anchor-referenced number based on their own device assumptions. The lesson is that a clearance number means nothing until you know two things: where it is measured from, and where it assumes the anchor is.
The SRL Difference: Shrinking the Free Fall
A self-retracting lifeline reduces the free-fall component. The line stays near-taut as you move, so when you slip, the brake engages within inches instead of after several feet of acceleration. Under the current SRL standard, ANSI/ASSP Z359.14-2021, devices come in two classes. Class 1 devices must be anchored at or above your dorsal D-ring. Class 2 devices are built and tested for anchorage above or below the D-ring, including foot-level and leading edge work, with an energy absorber sized for the longer fall that a low anchor allows. With an overhead anchor, arrest distances are short enough that total clearance often lands in the 6-to-9-foot range, depending on the device, which is why overhead SRLs are the default in warehouses and on structural steel. Anchored at foot level, a Class 2 SRL needs more fall clearance: our calculator plans 4.5 feet of deceleration for that setup and requires 14.5 feet or more.
Swing Fall: The Part of the Calculation Most Crews Ignore
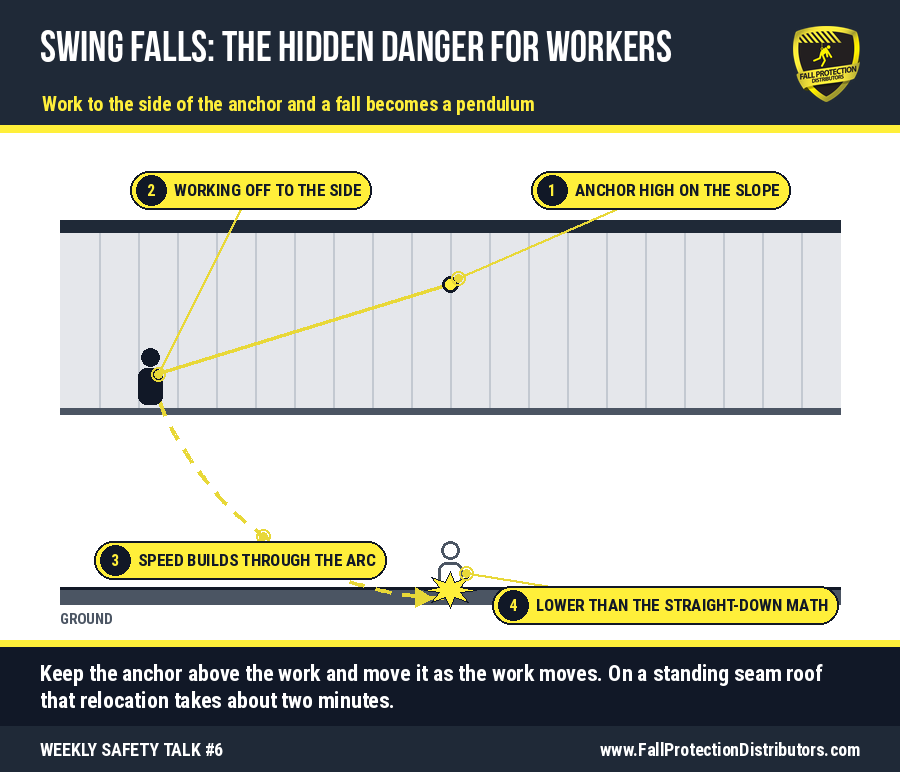
Every diagram of fall clearance shows a worker falling straight down beneath the anchor, but most real falls don't happen that way. If you are working 10 feet to the side of your anchor and you slip, the fall becomes a pendulum: you drop, the line comes taut, and you swing back beneath the anchor in an arc, gaining speed the whole way. Swing fall creates two separate dangers. The first is impact, because swinging into a wall, a lower roof edge, or a rooftop unit at the bottom of the arc concentrates the energy that a vertical arrest would have spread across the harness. The second is lost fall clearance, because your fall distance is measured along the line at its taut length, so at the bottom of the arc you hang lower than the straight-down calculation predicted, and the margin you planned on is smaller than you thought. The fixes are rigging decisions rather than equipment purchases: keep the anchor above the work area as much as possible, and move the anchor as the work moves instead of side-loading from the same anchor point all day. On a standing seam roof, that relocation takes about two minutes, because a clamp-on anchor such as the SSRA1 moves along the seams without leaving penetrations. When the work requires maximum worker mobility on large roofs, a horizontal lifeline keeps the anchor location above the worker. It also adds one new factor to the calculation: the lifeline itself deflects downward during an arrest. Our calculator plans about 1 foot of deflection for every 5 feet of span so that a 30-foot span can add roughly 6 feet to your clearance requirement. Horizontal lifelines must also be "designed, installed, and used, under the supervision of a qualified person" (29 CFR 1926.502(d)(8)).
Common Fall Clearance Mistakes To Avoid
- Measuring from the gutter instead of from the working surface. The eave might be 12 feet above the ground while the spot where you are standing is 20 feet up the slope. Clearance runs from where the fall starts to the first thing you can hit, so measure from where you actually work.
- Forgetting that the lanyard is part of the fall. On a foot-level anchor, you fall to the level of the anchor and slide the full length of the lanyard before the slack is gone. Be sure to add the worker height into the fall clearance calculations.
- Counting the ground as the lower level. The standard says the system must keep you from contacting any lower level, and a porch roof, a scaffold deck, or a parked truck is a lower level. Your clearance is calculated to the first thing you can hit, not necessarily the ground.
- Assuming any self-retracting lifeline can be anchored anywhere. SRLs are rated by class. A Class 1 device must be anchored at or above your dorsal D-ring, so clipping one to a foot-level roof anchor puts it outside its rating. Foot-level and leading edge work requires a Class 2 device, and the class is printed on the device label.
- Ignoring swing falls on wide roofs. One anchor serving an entire roof area guarantees a swing fall when working near the outer corners. Relocate the anchor with the work, or add a horizontal lifeline so the anchorage tracks above the worker.
- Running the numbers once and reusing them forever. Clearance is specific to the job, the anchor, and the device. That is why the printable worksheet at the bottom of this post is blank where it matters: the foreman fills it in on site, and the crew signs it. As conditions change, so does the safety plan.
Do State Regulations Change the Fall Clearance Math?
State regulations enforce the same 1926.502(d)(16) performance criteria, or stricter versions. What changes by state is when fall protection is required. Washington triggers at 4 feet in construction, California runs its own residential roofing rules, and the full picture is in Talk #1 and our state-by-state regulations database. States with low trigger heights require fall protection on lower roofs where arrest clearance is hardest to find, so those are the states where the restraint conversation from Talk #5 matters most.
What Happens When You Get It Wrong
In 2026, a serious violation can run up to $16,550, and a willful or repeat violation up to $165,514 (OSHA penalties). A fall arrest system without proper clearance can cause a worker to hit the lower level. Investing five minutes with the worksheet during the safety planning phase prevents these risks.
Frequently Asked Questions
What is fall clearance?
Fall clearance is the vertical distance a personal fall arrest system needs below you to stop a fall before you contact a lower level. It combines free fall, shock absorber deployment, harness stretch, D-ring slide, and a safety factor. If the distance below your position is less than that total, the system cannot complete the arrest and the setup does not comply with 29 CFR 1926.502(d)(16)(iii).
How much fall clearance do I need with a 6-foot lanyard?
Measured from the surface you are standing on: roughly 13.5 feet with the anchor at D-ring height, about 12.5 feet with the anchor overhead, and roughly 19.5 feet with the anchor at foot level. Always confirm the totals against your device's manual, because absorber deployment varies by model.
How is fall clearance calculated?
Add five components: free fall distance (set by anchor height and connecting device), deceleration distance (up to 3.5 feet for a standard shock-absorbing lanyard per 29 CFR 1926.502(d)(16)(iv)), harness stretch (about 1 foot), D-ring slide (about 1 foot), and a safety factor (2 feet). Then compare the total against the distance from your working surface down to the lower level or obstruction you could contact.
What is the total fall distance for a 6-foot tall worker wearing a 6-foot shock-absorbing lanyard?
With the anchor at D-ring height, plan on about 13.5 feet measured from the working surface: 6 feet of free fall, up to 3.5 feet of deceleration, about a foot each of harness stretch and D-ring slide, and a 2-foot safety factor. OSHA's Technical Manual gives 17.5 feet for the same fall because it measures from the anchor and includes the 5 feet from the D-ring down to the feet. Same fall, different reference point.
Can I tie off at my feet?
Only with equipment rated for it, and only when a higher anchorage is not available. A standard 6-foot lanyard anchored at foot level produces roughly 11 feet of free fall, which exceeds the 6-foot limit in 29 CFR 1926.502(d)(16)(iii). OSHA's September 21, 2007 interpretation letter recognizes that foot-level anchoring typically exceeds the limit. Compliant options include a lanyard designed and labeled for 12-foot free falls, a Class 2 self-retracting lifeline, or rigging fall restraint so the worker can't physically access a fall hazard.
Do self-retracting lifelines need fall clearance?
Yes, just less of it. With an overhead anchor, total clearance needs are 6 to 9 feet depending on the device. On a foot-level anchor, a Class 2 SRL still needs roughly 14.5 feet or more.
What is the difference between Class 1 and Class 2 SRLs?
Under ANSI/ASSP Z359.14-2021, a Class 1 device is anchored at or above your dorsal D-ring. A Class 2 device is built and tested for anchorage above or below the D-ring, including foot-level and leading edge applications, with an energy absorber sized for the longer fall. The class is printed on the device label, so check the label before the device goes on a roof anchor.
What is swing fall and why does it matter?
Swing fall happens when you fall while working to the side of your anchor: the line comes taut, and you swing back beneath the anchor in an accelerating arc. It matters for two reasons. You can strike walls or equipment at arc speed, and at the bottom of the arc you hang lower than a straight-down calculation predicts, which can allow the worker to strike a lower level. Keep the anchor above the work area and relocate it as the work moves.
Does a horizontal lifeline change the clearance calculation?
Yes. The lifeline deflects downward during an arrest, and that sag adds to your fall distance. Our calculator plans about 1 foot of deflection per 5 feet of span, so a 30-foot span adds roughly 6 feet to the requirement. Horizontal lifeline systems must also be designed and used under the supervision of a qualified person per 29 CFR 1926.502(d)(8).
Is there a fall clearance requirement in the OSHA standard?
Not as a set formula. 29 CFR 1926.502(d)(16) states performance requirements: limit free fall to 6 feet, stop the worker within 3.5 feet of deceleration, and ensure the worker does not contact any lower level. The clearance calculation shows that your setup meets that last requirement before anyone ties off.
Can you use fall arrest on a single-story house?
Yes, with the right rig, but not with a deck-level anchor and a standard 6-foot lanyard at the eave, because that setup needs roughly 19.5 feet of clearance and a single-story eave gives you 10 to 12. Mount the anchor high on the slope so it sits above the worker, keep the slack out of the line with a rope grab or a self-retracting lifeline, and the required clearance drops into the range the house actually has. If the line cannot reach the eave, you are in fall restraint and clearance stops being the limiting factor. Run your exact setup through the calculator before anyone ties off.
What if my roof does not have enough clearance for fall arrest?
Change the system to limit worker movement. The options, in the order most crews should consider them: rig your equipment for fall restraint so the worker cannot reach the edge, raise the anchor point, switch to a device with a shorter arrest distance, or re-plan the task. A fall arrest system without adequate fall clearance is not compliant.
Toolbox Quiz: Test Your Crew
Five questions from this week's talk. Discuss these topics at the safety meeting, let the crew argue, then score it. The one-page printable clearance worksheet lets the foreman run this math per job, with a crew sign-off table for your training records (29 CFR 1926.503(b) requires written certification). It's free, and you don't have to give us an email address to get it.
The fall clearance calculation has five components; your rigging controls the biggest one, and the same lanyard can need anywhere from about 12.5 to about 19.5 feet depending on where you put the anchor. Self-retracting lifelines arrest a fall faster and reduce total clearance, and careful anchor placement helps avoid swing falls. Run the calculator during planning, fill out the worksheet on site, and decide whether restraint or arrest is the right rigging for the project.
Work safe up there.